Hi everyone!
This is my answer to the “New to me challenge”.I decided to make a bra!
Well, no, I didn’t decide that at all.
One of my clients ( I make sewing patterns for a few small independent designers) wants to add a few simple bras to her loungewear collection.
So she ordered the Watson bra pattern as a test. Probably she will go for lots more lace and fancy things later, but both she and I are new to underwear design and you have to start somewhere, right?
So a few weeks ago the Watson pattern from Cloth Habit dropped into my inbox, and I printed it out. All fine.
But you also need some basic notions to get started. I did some research and came across B,wear.com here in Sweden. But my client found all the little details too expensive and ordered instead from a cheap place. Well, buy quality is my advice… but now I’m stuck with some wobbly plastic rings and sliders, scratchy plastic hook-and-eyes and sloppy see-through bra strap elastic. Sigh. At least it’s all in black….

As some kind of revenge, I decided to start with a test run of the pattern, all for myself!
In my stash I had the leftovers of a spongy, thick and huge dress from the 70’s. A thrift store bargain that lost the lower part to some project long ago.
But the print, it’s Oh-So-Gorgeous! Hand painted flowers all over, including big daisys in orange, yellow and lilac. This was perfect for a bra!
(I also found some nicer elastic and a not-so-plastic closure, for my own sake)

70’s psychedelia
The pattern was super easy to print, and no taping required!
Sadly, the advice given on size, in the pattern, is incorrect. You will never get a good fit if you add to your chest width, you always subtract. ( Yes, I used to be a bra seller) But this post is not the time and place to go into that subject…
I picked my usual size and I think the fit would have been JUST PERFECT, if my material had been a bit more stretchy. Too bad Lycra/Elasthane wasn’t around in the 70’s 😦
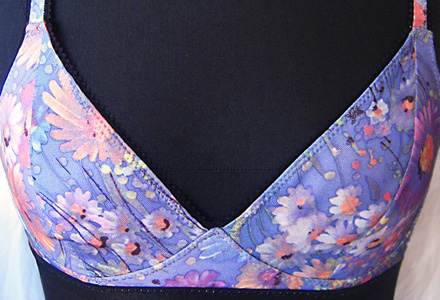
I did spend some time trying to get maximum amount of flowers on my bra. It took some time but was worth it. As the fabric isn’t very stretchy in any direction, I cut them just as I pleased, not following any grainline. As seen here, I customized the bottom band a little, making it less wide.

For lining I used an old top in a very thin and soft orange rayon jersey. Looking back, it was too thin and different from the outer fabric, they didn’t behave the same way at all, and that didn’t work out well. But this is just a test, so let’s just move on!
I started with the cups, fabric and lining. And here’s another little advice, if you jump into bra making, the best help ever will be a tailor’s ham! It was more than perfect for pressing! Here’s a portrait of my old friend, the tartan ham!


Couldn’t be smoother!
For the cradle I had some powernet, and used it following the instructions.
As an added stabilizer I used a small piece of ordinary cotton fabric in the center. In my experience, this area should not stretch at all.

I read the instructions through, but didn’t really follow them. I cannot for my life understand why the lining isn’t used to to fully line the bra band and cradle, and hide the bottom seams of the cups? At least, thats the way I want it, so I sort of “burritoed” my bra!
Do you usually burrito your bras? Just asking, only because it sounds hilarious….

Hidden seams inside, and obviously not caring a lot about the color of the thread here!
Burritoing away, I suddenly realized I have made a mistake! Bummer, the elastic should have been added a little later and continued all the way to the the far right, seen below.
But it worked out quite ok anyway.

Next step was the straps. I feared not having enough of my replacement elastic, so I made the front of the straps out of the fabric. Basically a strip of fabric with two rows of the picoted elastic, later turned to the backside and stitched down.

The first one. Not good.

Let’s try again!

Much better!

Oh my god, they’re super cute! I love my pretty straps!

Another ( small ) thing I’m questioning about the pattern is the amount of seams, and seam allowances that all meet at the top of the cups. This is a major lump! Of course, a thinner fabric would help, but still!

Attaching the rest of the straps showed me I had plenty of elastic, they are now twice the length I need! I’ll fix that later after I’ve tried it on.

Attaching the other end of the straps was no problem!
Now, for the bottom edge elastic, or hem elastic that goes around the chest, I have some opinions… ( bra seller talking here)
The length of the hem elastic is not given in the pattern, I know there has been a lot of talking about this on blogs. I understand that the designer sort of cheated a little on that subject, it’s easier to not say anything, than going into all the explanations needed.
But in short, your hem elastic should be fitting REALLY tight around the chest, and probably be much shorter than the bottom edge of your bra. Here’s mine!

An easy way to pin elastic to a much shorter fabric is to attach both the ends first…..
After that you secure one of the ends, with a pin, to a heavy thing, like a big roll of jersey 🙂 a chair or anything.

Now you can stretch the whole thing using only one hand, and use the free hand to hold and pin the two parts together. Or take a photo, like I did.

Finally, the whole thing! Love the look of it!

The backside.

For my taste, the straps are placed WAY too far apart in the back, they will slide off the shoulders in no time. But that is an easy thing to fix on the next one!
Yep, there will be a next one for me! This was fun and interesting, and I will make another one soon, I’m sure!
Finally, a closer look at the edges, and some pretty polyester daisies.

Finally, I have to clarify: My client is not interested in copying the Watson bra, ( and neither am I ). we’re just going to use it as a starting point for her future collection plans.
But as she’s asking for it, I too might branch out into lingerie in the future, in my own pattern company…
Because this was fun!
This post is an exact copy of the one on my blog, Gavanna Sewing, but feel free to check it out anyway!
Tina

Excellent post and very informative.
LikeLike
Thank you very much! You never know when you need a bit of a polyester dress, so keep them all… at least the pretty ones!
LikeLike
Fabulous repurposing 🙂 and lots of great tips. It looks very cute!
LikeLike
Thanks!!
LikeLike
such pretty fabric, it found a great new purpose!
LikeLike