
The pattern I used for the “one pattern, two ways” challenge is one I have made several times already. See my April “Flower Power” post…& my May “Inspiration Nation” post. It’s the Shelley bra, from Pin-Up Girls.

I’ve been on a big bramaking kick lately & this challenge seemed like a great way to showcase the way small alterations & fabric choices can make the same pattern look completely different.

I think of the first bra as the “Bluebird bra,” because the Duoplex I used in the cups & frame is called “bluebird” on the Bramaker’s Supply website. In real life, it’s more of a soft Wedgewood blue color. I paired with pretty yellow lace with pink accents. The Shelley is specifically designed for a lace upper cup. I made a little tweak by shortening the bridge & widening the upper cup so the lace meets above the bridge & appears continuous. I also placed a little extra lace along the bottom of the cup, & cut the frame into a Gothic arch (see the way the bottom arches up in the middle?).
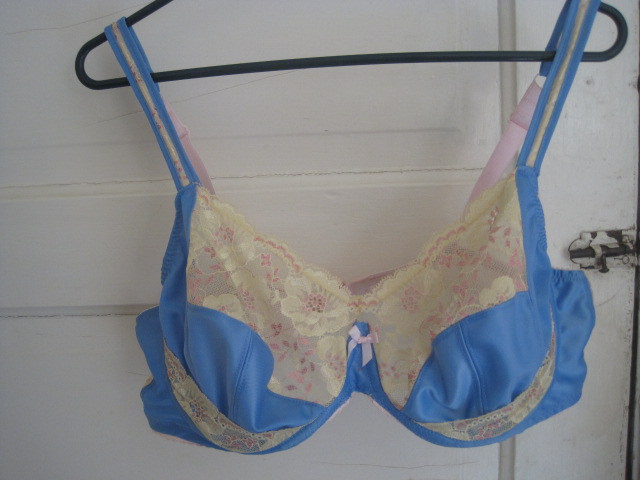
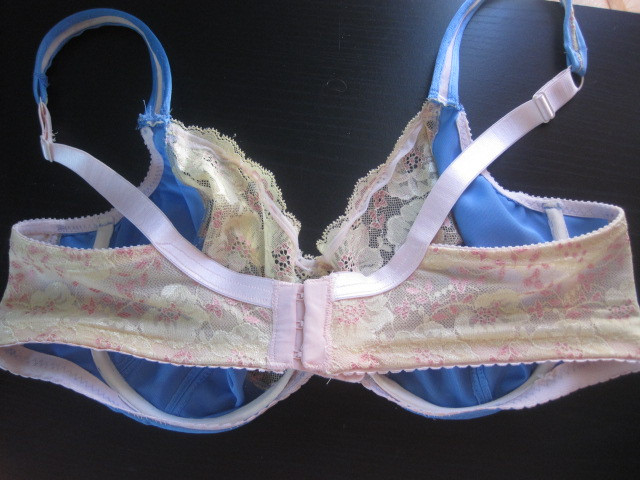
But mostly I used all my lace on the back band. I used pink powernet under the lace (a necessity for a larger cup size like mine—a band constructed only of stretch lace would never give me the support I need). I also used pale pink findings throughout to pick up the pink accents in the lace.
The straps were a technically tricky bit of sewing. They are made of lace hand-basted over sheer, stable nylon. I finished the sides with Duoplex that I ran through my bias tape maker (though it was cut on the straight grain because stretchy straps are a recipe for disaster!). The end result is fairly subtle, but I love the fact that this entire bra is just covered in lace!

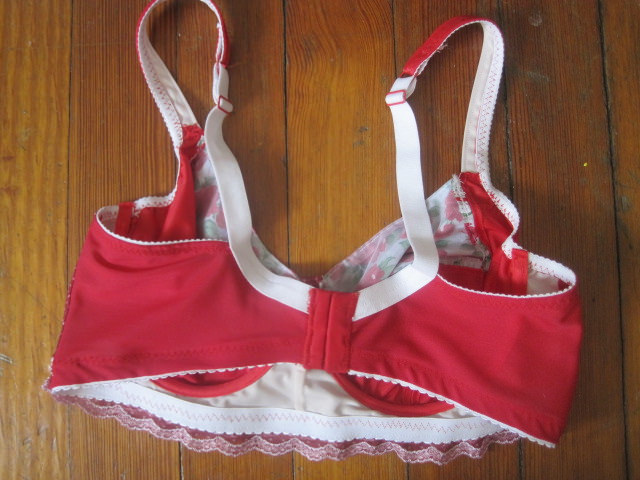
I call the second bra the “Vintage Valentine”. I’m not in the habit of naming my makes, but come on. This thing just SCREAMS ornate Victorian valentine! (& yes, this is me modeling it! Eek!)

I started with the polka dot netting with this one. I actually don’t really care for polka dots, nor for red lingerie, so I was really flummoxed about using this stuff in a bra. It was also VERY sheer. To make the color pop at all, I had to layer it, but the polka dots in the bottom layer were still visible through the top layer. Ultimately, I decided to use the netting on the frame instead of the upper cup, & preserve the scallops along the bottom. I just placed the low point of the scallop along the bottom of the pattern piece & cut it out that way. & then I realized that I had to layer my netting with each polka dot precisely on top of another polka dot if I didn’t want the whole thing to be an unsightly mess of random polka dots. This gave me the chance to offset the two rows of scallops, but it necessitated a LOT of very finicky hand-basting. & I had to extend the length of the back band a bit to match the longline dimensions of the frame.

So what about the cups? I thought I’d just do all red Duoplex, but I wasn’t stoked about it. It just seemed kind of blah. I happened to pile the fabrics & notions I was pulling for this bra next to the scraps left over from my rose print Marigold dress, & suddenly I had an idea! What if I cut the upper cup from those scraps of Swiss dot? I could use a bit of white lace along the top to finish the edge & soften the impact of all that red.

I happened to have several huge spools of antique rigid lace trim I picked up at a thrift store for dirt cheap. I got it out & started draping it along the cup edge & had another idea…Would ribbon fit through those little holes? I tried some of the narrowest ribbon I had & it kind of worked. I decided to keep an eye out for something even smaller.
The next day, I hit up the Hancock liquidation sales & came me across this 1/8” red polka dot ribbon. See above: re: my feelings about red & polka dots, but I knew it would be PERFECT for turning my boring white lace into bespoke insertion lace! I tried a few different treatments trying to decide if I wanted more or less ribbon showing, & if I wanted the rows even or staggered. & this is what I decided on!

I kept the back simple (just red powernet) & used white notions for a clean, bright finish. I came upon a trio of imitation pearl ball shank buttons in my stash that called out to decorate the bridge. The bra really came together once I sewed those on.
You can stop by my blog for more details & to see the matching undies I made for each of these bras (not from indie patterns, sadly, so I won’t include them here—but the Vintage Valentine undies have quite an elaborate ruffle situation happening!). Thanks for reading!

Pingback: And the One Pattern, Two Ways contest winners are…. | The Monthly Stitch
They both looks great. The fabric combinations are very good. It takes courage to sew this. Well done.
LikeLike
Thank you! Sewing bras seems really intimidating (like sewing jeans, bathing suits, etc), but really, if you can tackle elastic & follow a precise seam allowance, you can do it! Now that I’ve nailed the fit on this pattern, my handmade bras fit better & provide better support than any RTW bra I’ve ever owned. & it’s so satisfying to know that literally everything I am wearing (well, aside from shoes) is something I made myself!
LikeLike
I’ve never been tempted to sew a bra… until today. These are sensational.
LikeLike
Thanks! Give it a try sometime! I know it seems intimidating, & sourcing the notions can be a pain in the butt, but the satisfaction level is incredible!
LikeLike
An amazing fit ! The red one is absolutely gorgeous.
LikeLike
Thanks!
LikeLike
They’re beautiful! I can’t decide which one I like best!
LikeLike
Thank you! I don’t know which one I like best either!
LikeLiked by 1 person
i love that pattern so much and i love what you did with it. so creative! but my cup (K) size is bigger than the pattern (H) so i wonder – how hard would it be to enlarge the cup? has anyone done it?
LikeLike
Well, you could try a sister size. The biggest size in the line is 48H, which corresponds to a 42K. You can Google sister sizes to figure out the size that might work for you.
Also, if you have never made a bra before, or if you just want to finesse your techniques, the Craftsy classes that Beverly Johnson teaches (she designed this pattern) are 100% worth the money. She’s very responsive to student questions & could probably walk you through whatever alterations you need to change the cup size.
LikeLike
They’re both so lovely, great job! It’s so interesting to see how different a couple of tweaks can make a pattern! 🙂
LikeLike
Thank you! I feel like bras lend themselves especially well to showcasing the results of small pattern alteration & fabric choices because they are comparably so small. Making a Gothic arch, for instance, is just a matter of changing the angle of the frame under the cup by less than 1/2″. But it has major impact! I love making bras, & I love the Shelley pattern, but I don’t want a drawer full of identical bras in different colors, so I am always looking for little ways to change the look & experiment with techniques & finishes.
LikeLike
So inspiring!
LikeLike
Thank you!
LikeLike
Impressive! Love that you were brave to give us a sneaky (but modest) peek at you in it. You have really got some skills! 🙂
LikeLike
Thank you! & yeah, I debated including a boob picture, but you really kind of have to see it on to get the full picture, & I don’t have a dress form!
LikeLiked by 1 person
Oh my, those are gorgeous! I am especially in love with the white and red one. Perfect name for it, too. 🙂
LikeLike
Yeah, the red & white one definitely has the most hanger appeal! The Gothic arch on the blue one lends a lot of extra comfort though. & I just really love the way the colors look together.
LikeLike
They both look so good and the fit looks great.
LikeLike
Thank you! & yeah, the fit is spot on. I had to tinker a lot to get it right, making tiny 1/4″ alterations here & there. But the Shelley is a great base pattern, so it was really just a matter of perfecting.
LikeLike