
Hi everyone! I’m back with my usual last minute post for IPM. I love it when sewing challenges collide and this one will also be my entry for October #sewmystyle2018. The pattern I’ve gone for is the Portsmith Tote bag from Klum House Workshop. The pattern is super simple (just two rectangles!) and they recommend you buy the kit or at the very least the strapping. I think that’s almost cheating, (plus I live in the UK and would have no time to wait for stuff to be shipped over) so I thought I’d cobble it together with things I already had. My favourite kind of sewing!
I bought some cork fabric nearly a year ago and it’s been languishing in my stash waiting for the right pattern. My original plan was to pair it with some pewter coloured pleather that I also had in my stash. It very soon became apparent that the pleather was waaay too stretchy to be used as a bag so I may well use it for next week’s challenge instead.
Instead, I found some black vinyl that I originally used to re-cover some dining room chairs. When I got my fabrics together I was really disappointed to find that there was not enough of the cork. I really wanted the cork to be at the top of the bag because I didn’t think it would be robust enough to handle being the bottom. So what I did was chop the cork piece in half and sew a strip of vinyl in the middle of both cork pieces, so it reached the size of the pattern piece. I then cut another piece of vinyl for the base piece which reinforces the bottom. There’s a bit of a ridge there but I’m calling it a design feature!
Despite this pratting around, it really didn’t take long to sew this because the pattern is so easy.

The pattern instructions get you to fold the bottom of the bag in a particular way but this meant that I had a lot of layers of thick vinyl. I did try to sew it on my machine but it wasn’t having any of it! I ended up hand sewing it which took ages and was very painful.
Once this was done the bulk of the bag was finished. Just a nice deep hem at the top and the handles to attach. It was the handles that took the most time. Most of the time was spent thinking of the best way of making and attaching them.
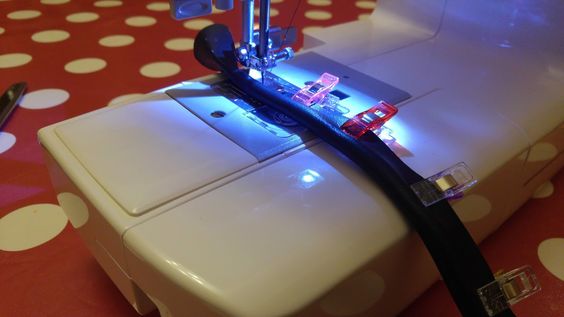
I decided to use my left over vinyl to make some straps. I watched a video on YouTube on how to sew leather straps (I’m sorry, I can’t seem to find it now to link it) and adapted the idea to suit.

Above is the vinyl cut out using a rough pattern. I used a craft knife to cut it out.

I interfaced the ends of the strap piece as this is the bit that’s attached to the bag. I then sandwiched a piece of rope (1cm-ish diameter) in the folded strap and used clips to keep it in place.
I then sewed down the sides with my zipper foot attachment on my sewing machine….
…and trimmed off the excess seam allowance.

I actually sewed the straps on to the bag, rather than just riveting them on like the pattern instructions suggest. However, I liked the look of the rivets so I took the nearest thing, eyelets, and installed them instead.
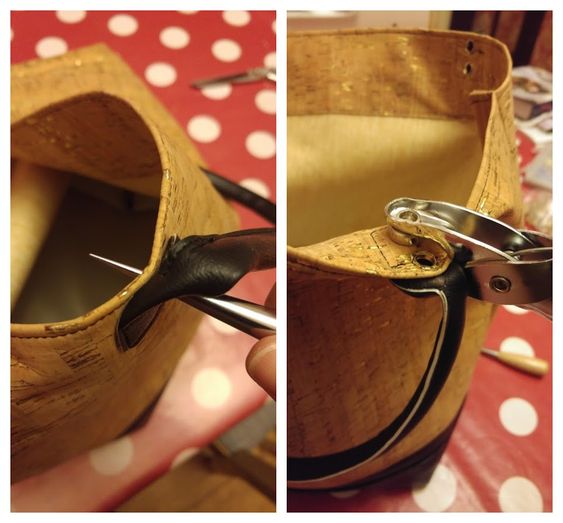
Installing eyelets really is terrifying! I hate poking holes in my hard work but it had to be done and thankfully I didn’t mess it up!

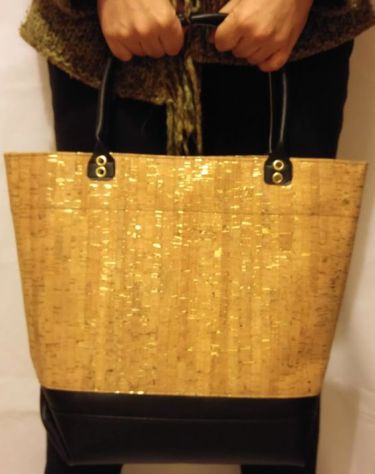
So here’s the finished bag! I really like it but I’m not sure how sturdy it will be. I won’t be carrying around really heavy shopping in it – I’m worried about those handles stretching out a bit.

See you next week!

Pingback: And Your IPM2018 Anything But Clothes Winners Are… | The Monthly Stitch
I love this! It looks so professional and classy. ☺
LikeLiked by 1 person
Thanks Emma (just don’t look inside – not quite so professional!) 😉🙊
LikeLiked by 1 person