
For my one pattern, two ways I’ve stitched up a pair of Sewaholic Granville shirts. I’ve always been a huge fan of Sewaholic and as soon as I saw this shirt I was in love. I bought it right away but it’s been languishing in my pattern stash waiting for me to return to normal size after having a baby and nursing for a year. Now that I’m me again, I’m ready to sew up the massive pile of fabrics I’ve earmarked for this pattern.
I started with a test garment a few weeks ago and was fairly pleased with my usual adjustments of shortening the shoulder-to-bust length as well as the sleeve length. I took out a crazy length of sleeve – something like 5″ to get my arm measurement whereas I usually take out somewhere around 2 or 2.5 inches! My test garment was a typical shirting fabric and it all went together without fuss so for this challenge I decided to really challenge myself.
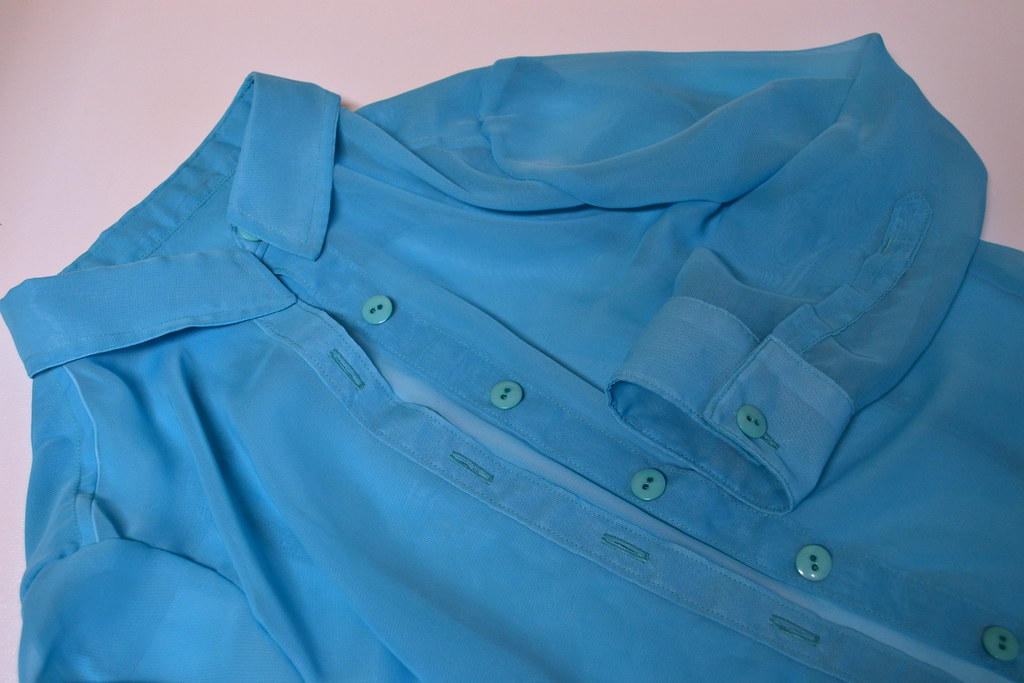
 The first way I made up this pattern was in a sheer poly chiffon. I made up version C without pockets as I’m just not a fan of boob pockets (talk about some awkward placement!). Here in Virginia it was about 95 degrees F today (pretty dang hot for you Celsius folks) but my husband keeps the house like an icebox so I needed a good layering piece that will keep me from forming icicles inside but still breathable if I pop outdoors for a moment. Being polyester though, it’s not as breathable as I would have liked so this will probably be relegated to spring/fall wardrobe rather than mid-summer.
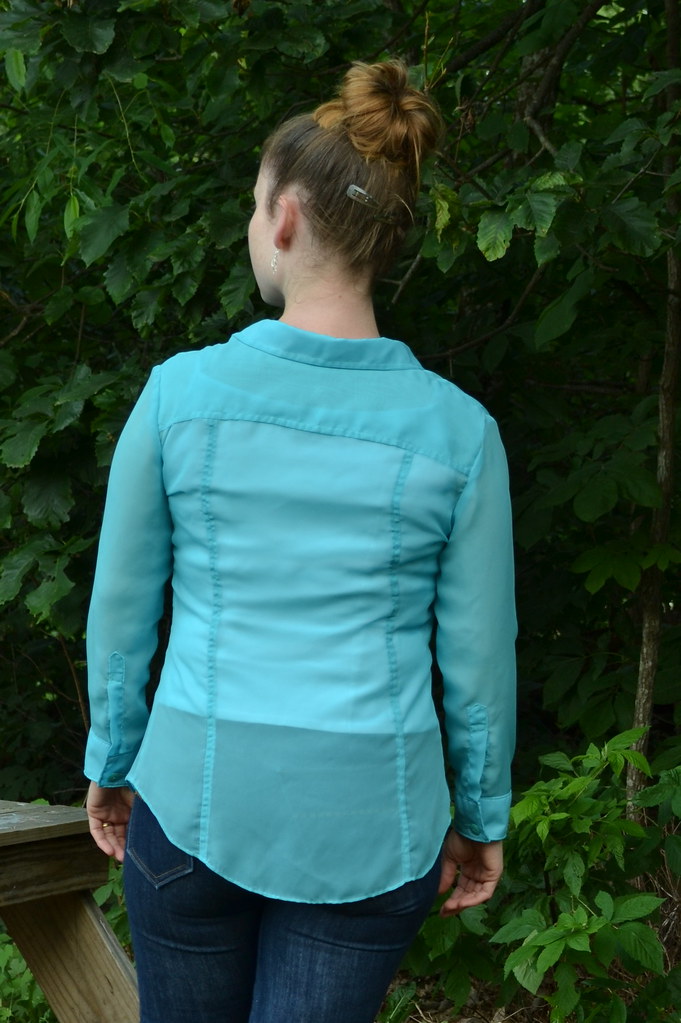
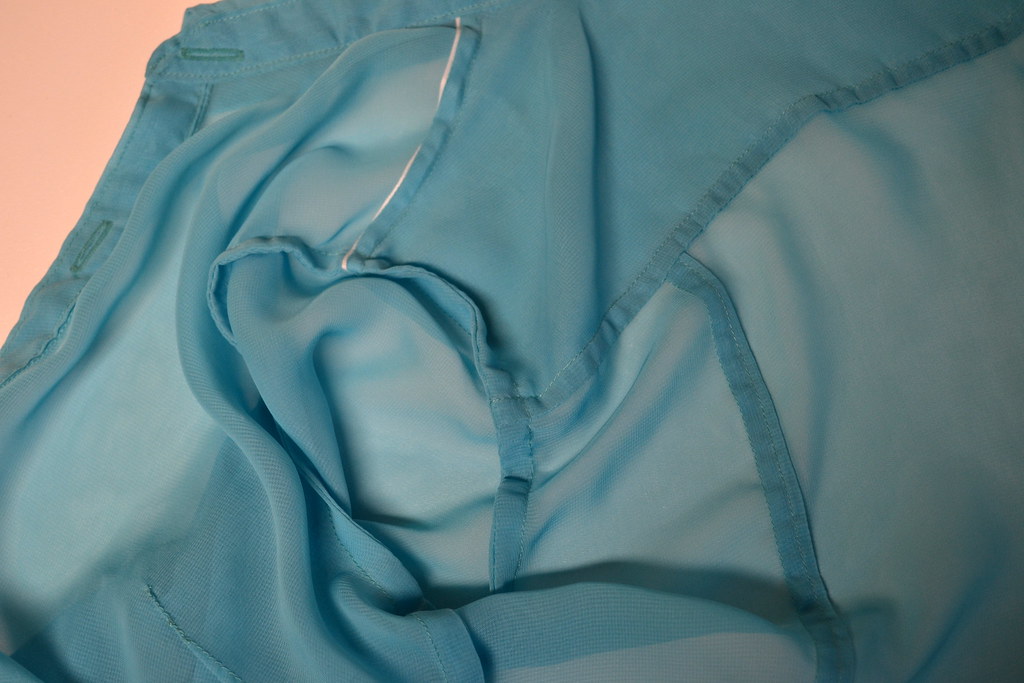
I knew I needed to stabilize this fabric somehow before cutting and had heard good things about using starch to stiffen up shifty fabrics. I researched a bit online and eventually decided to just use a can of spray starch to soak the whole yardage then iron it. I was worried about the starch flaking off so I waited a moment for it to dry slightly before ironing and it gave me no troubles. The slightly stiffer fabric was significantly easier to work with and I can’t imagine trying to make this pattern without starching first! Even with starching the sleeve plackets gave me a run for my money. Sleeve placket pinned up like a porcupine as evidence:
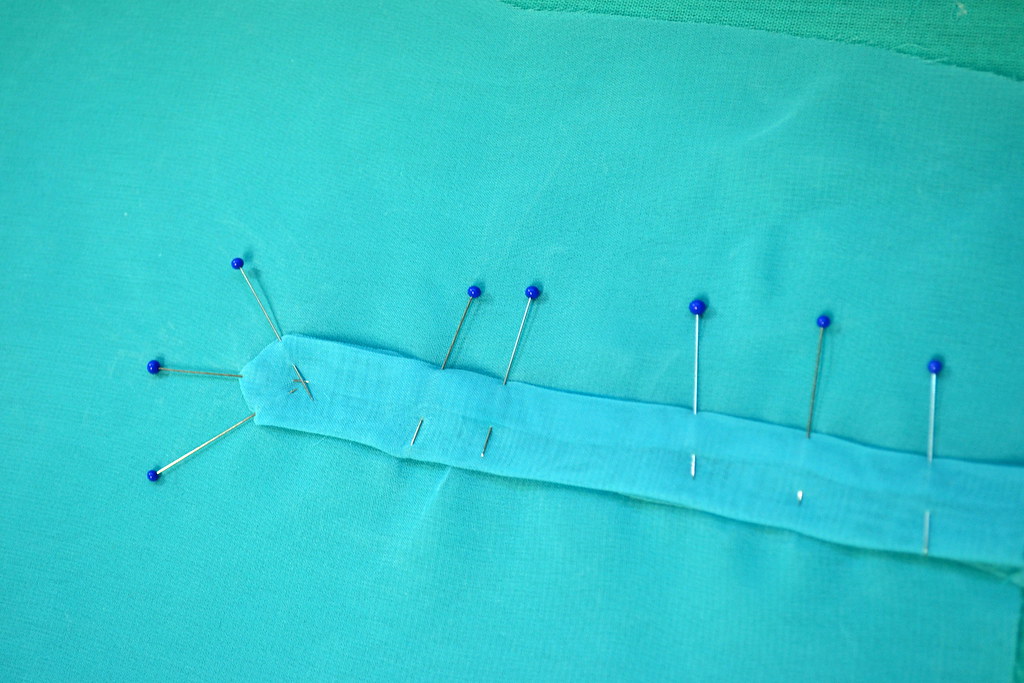 And a finished, albeit slightly wonky sleeve placket:
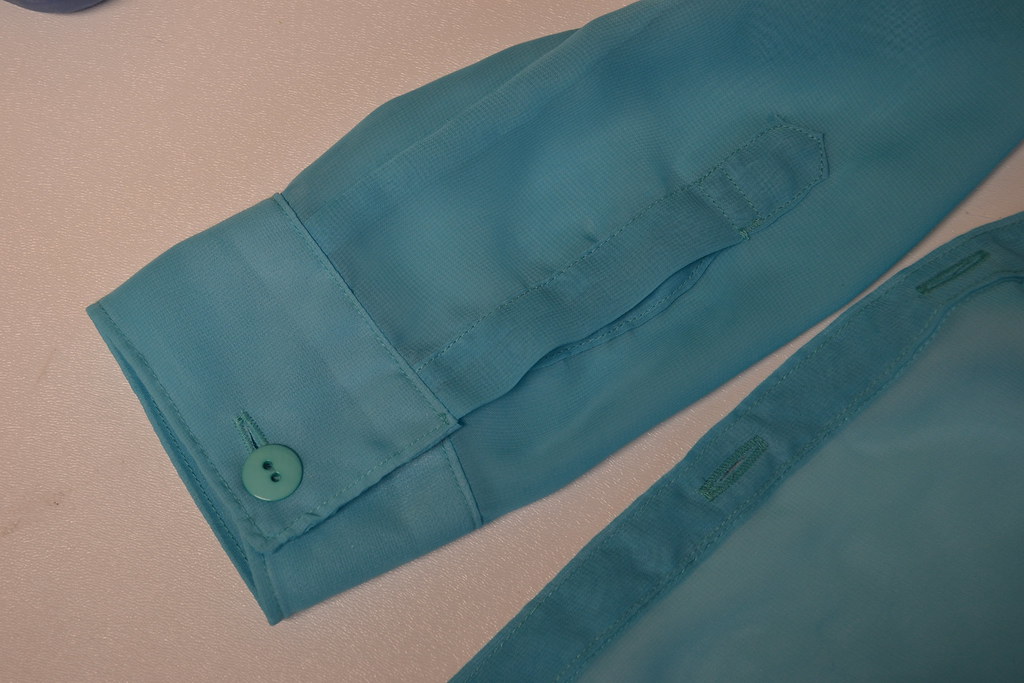
When I sat down to sew this chiffon version, I realized I hadn’t thought about interfacing at all. I took to the TMS Facebook group with the question to interface or not to interface? Thank you to all of you lovely members who helped me out. My instinct said yes but then I double guessed myself since it’s sheer. Several people suggested silk organza which was also my first thought but I didn’t plan ahead and didn’t have any readily available as my local fabric store doesn’t stock anything as nice as silk. I decided on some “sheer” iron on interfacing that I found at Jo-Ann’s. I also took the suggestions to use water soluble stabilizer when sewing the buttonholes and apply fray-check before cutting them open. I had never used water soluble stabilizer before so I just cut out some squares of it, pinned one layer on top, one layer beneath, stitched it up and hoped it worked.
 //embedr.flickr.com/assets/client-code.js
(spoiler: it worked perfectly!)
 //embedr.flickr.com/assets/client-code.js
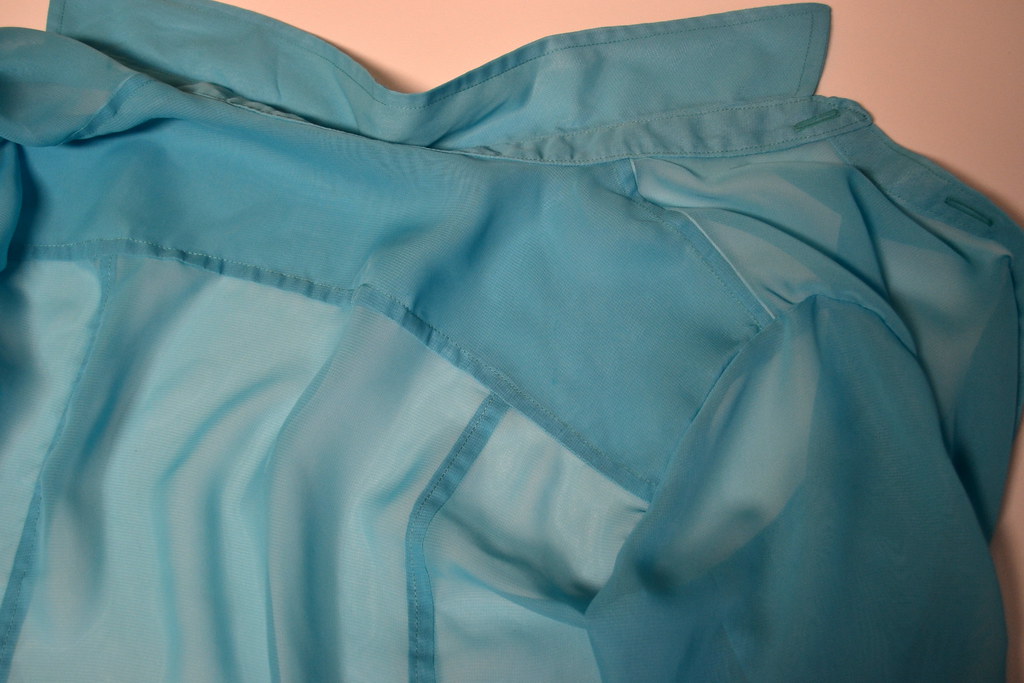
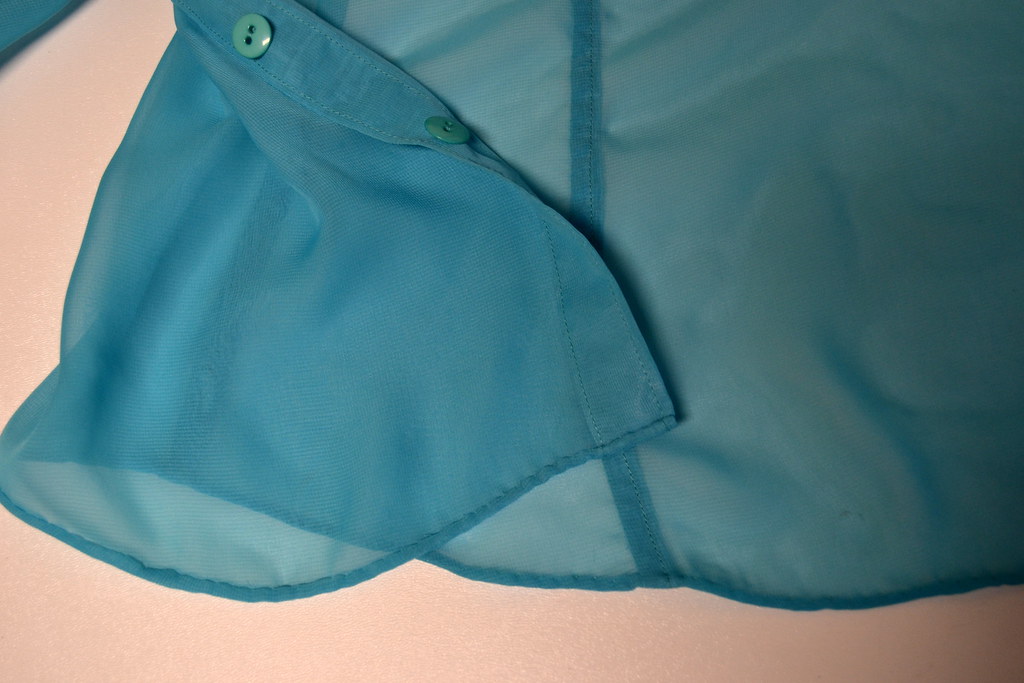
I made a few changes to the pattern instructions along the way. I French seamed all of the seams that were not designed to be fully-enclosed because this chiffon frays like mad. Even serging the edges wouldn’t have been a viable option. Besides the horrible fraying potential, I wanted the inside to be as tidy as the outside since it’s sheer and this is one case in which someone besides myself may enjoy the handiwork that goes on the inside of a garment.
Seams from the outside:
 //embedr.flickr.com/assets/client-code.js
And seams from the inside:
 //embedr.flickr.com/assets/client-code.js
I made one addition to the pattern by stabilizing the shoulder seams with twill tape, something I do to nearly every garment I make. In this case you can see the twill tape peeking out both from the inside as well as through the sheer outside. I think it looks rather neat and tidy from either side though.
I finished the chiffon with a hand-rolled hem because I’ve never been successful with a rolled hem foot and I’d rather have spent the hour it took me to hand stitch rather than fight with the machine for an hour and cry.
 //embedr.flickr.com/assets/client-code.js
It all turned out very well and I’m indebted to our fabulous community of sewists for it’s success. I love that we are all constantly learning and willing to teach at a moment’s notice!
 //embedr.flickr.com/assets/client-code.js
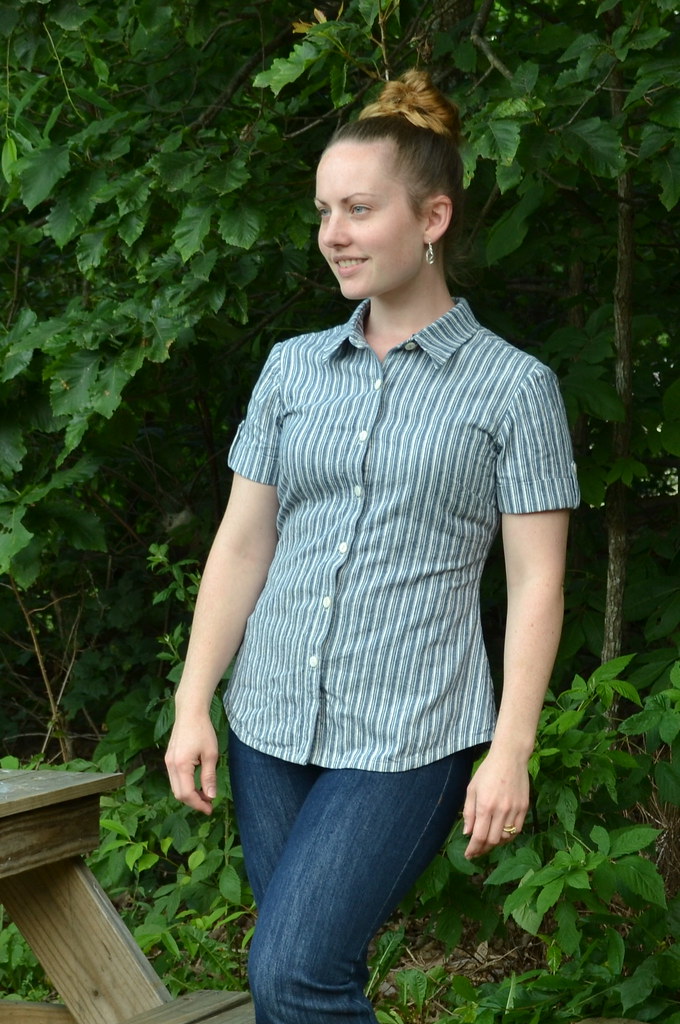
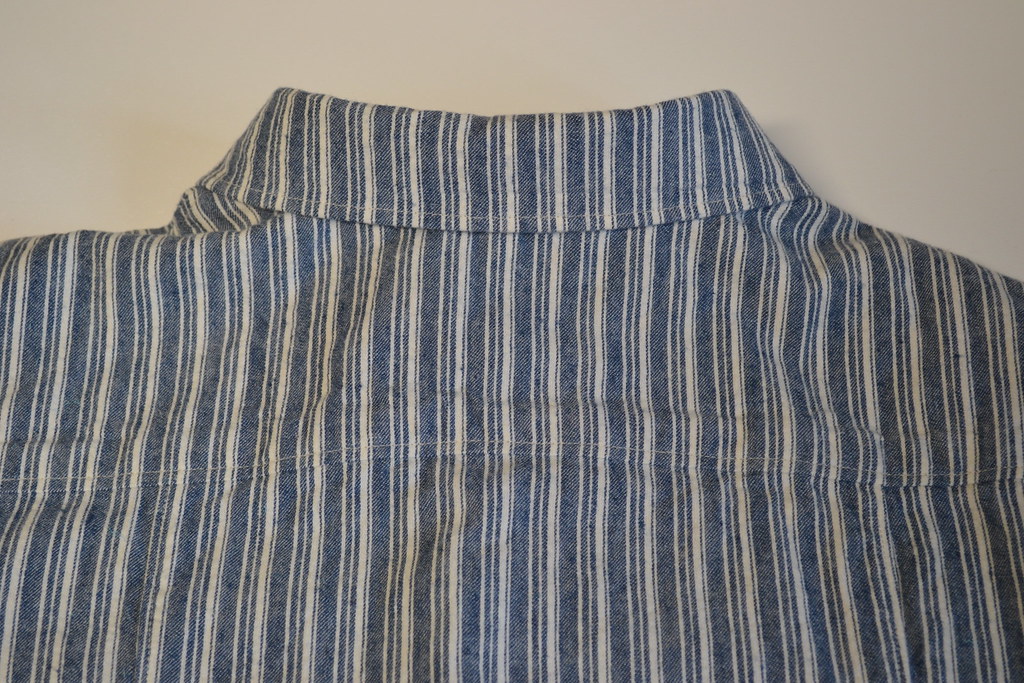
For my second version of the Granville, I got a bit more creative. I stitched this up in a beautiful fine linen with unbalanced blue and cream stripes. This fabric, which I picked up at Hancock a few months ago for this very purpose, was a dream to work with. It’s heavy enough to tailor well but still has enough drape to be comfortable and easy-going.
 //embedr.flickr.com/assets/client-code.js
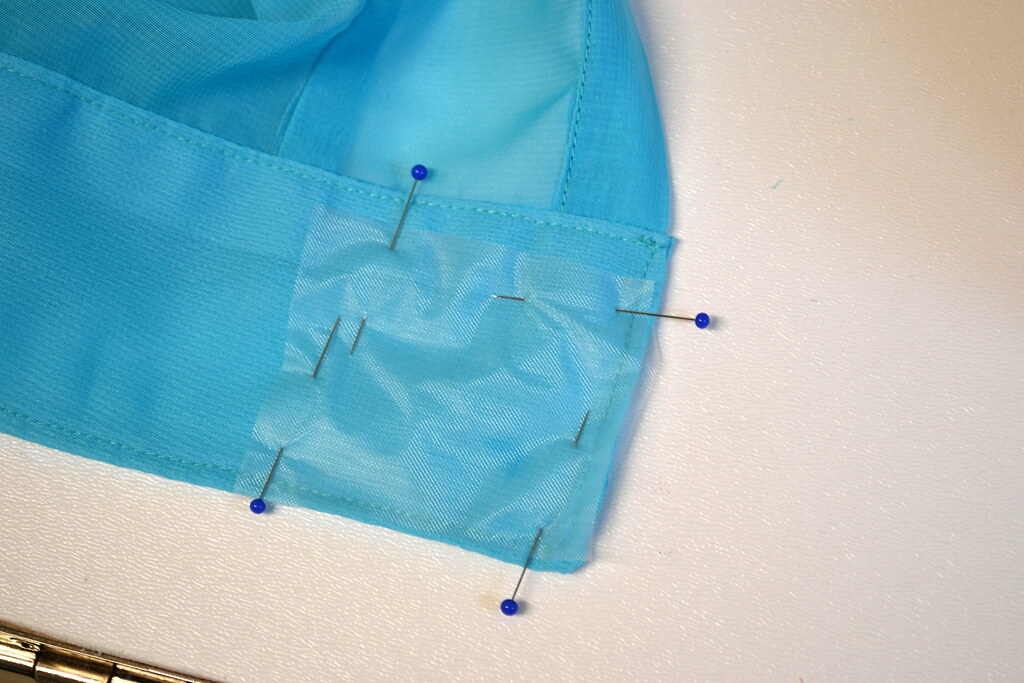
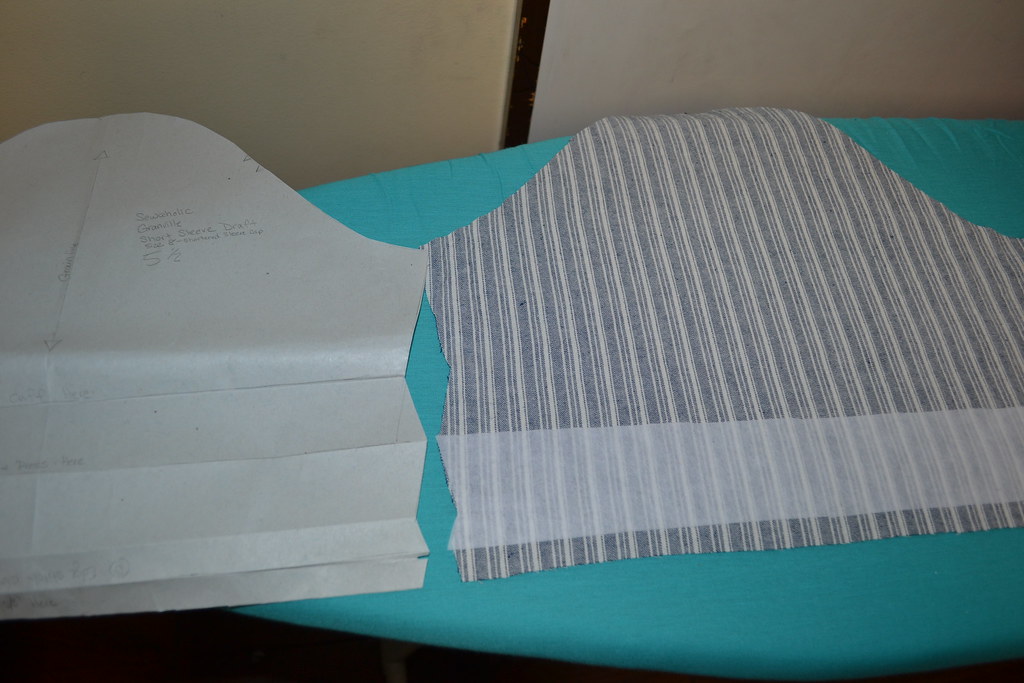
I couldn’t imagine this linen in anything but a summer top so I needed to make the Granville short-sleeved. The pattern does not come with this option and I looked around the web to see if anyone had hacked it. I found one version that simply cut off the sleeves and hemmed them up but I wasn’t fond of the look. I decided that my short-sleeve Granville needed cuffed sleeves. I traced off the sleeve pattern and worked up this crazy method of folding the sleeve to have a cuff all from one pattern piece. I cut off the excess and trued the edges into this wacky looking pattern. You can see the section of the sleeve/cuff piece that I decided to interface which ultimately became the outside of the cuff.
 //embedr.flickr.com/assets/client-code.js
I figured if I didn’t finish this in time for the 2 ways challenge, this would certainly qualify for the Hack It! Challenge. Lucky for me I finished in time (just ignore my no make-up, half-asleep after working all day and staying up way too late for many nights in a row look).
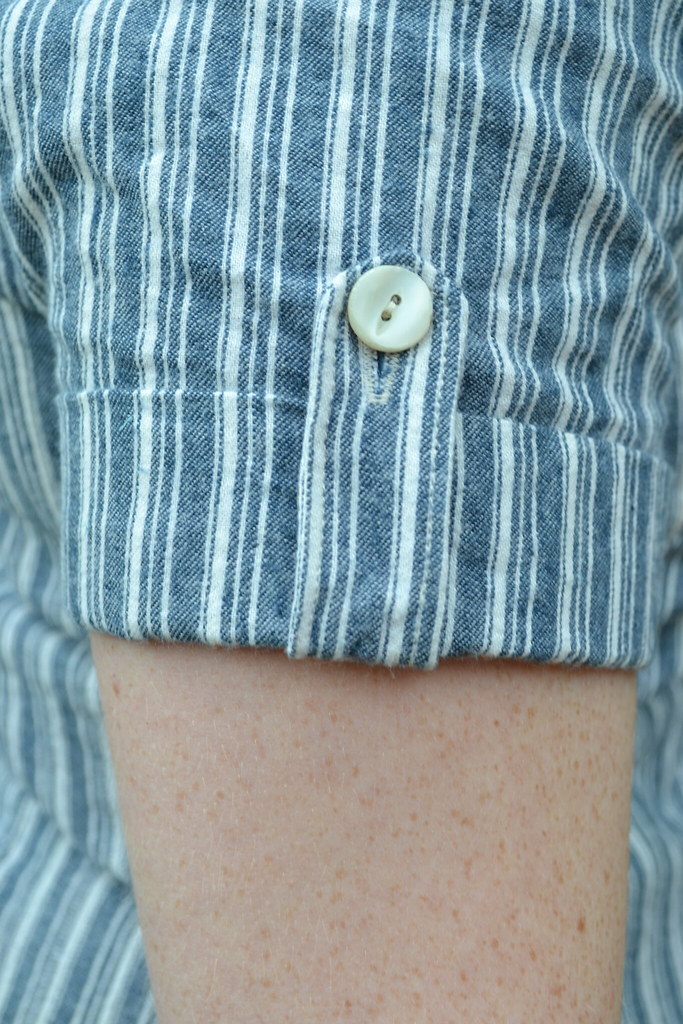
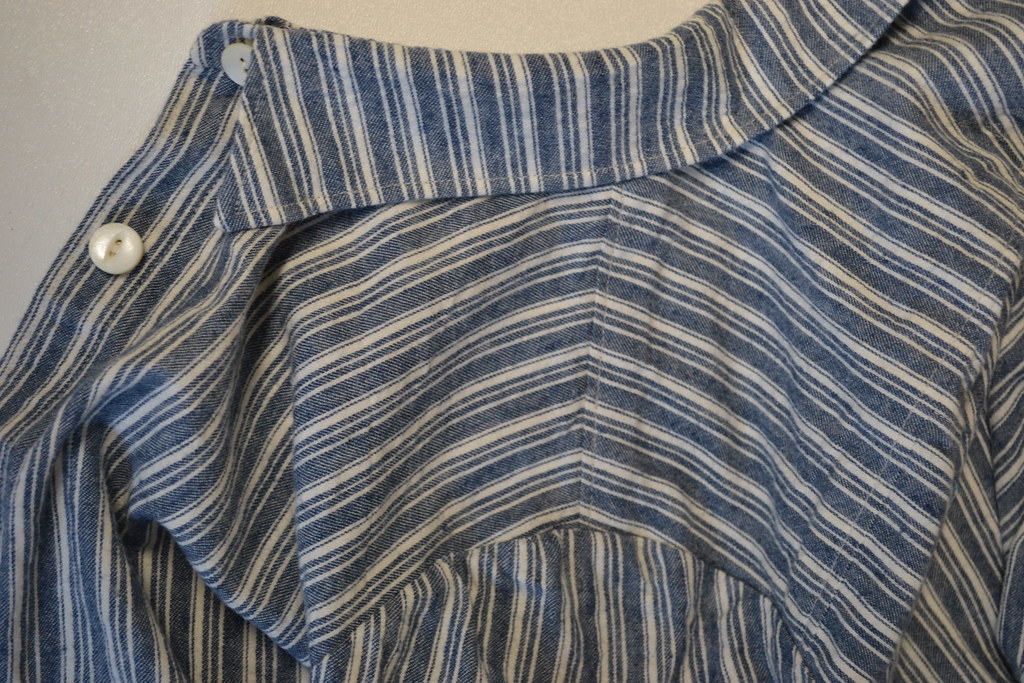
After I stitched up those crazy sleeve pieces, they seemed to be missing something so I worked up a little button tab to sort of hold the cuffs in place. They have functional buttons and buttonholes because fakies drive me nuts but I have no intention of ever un-cuffing the sleeves.
 //embedr.flickr.com/assets/client-code.js
I might have gone a little overboard with the pattern matching on this one but a beautifully matched pattern is one of my secret pleasures in life. The button tabs match up (see above) Nice match across the button placket in the front:
 //embedr.flickr.com/assets/client-code.js
I cut the collar and collar stand on the crossgrain to keep the pattern aligned at center back and perfect stripe placement from the yoke to the three back pieces (center and two sides):
 //embedr.flickr.com/assets/client-code.js
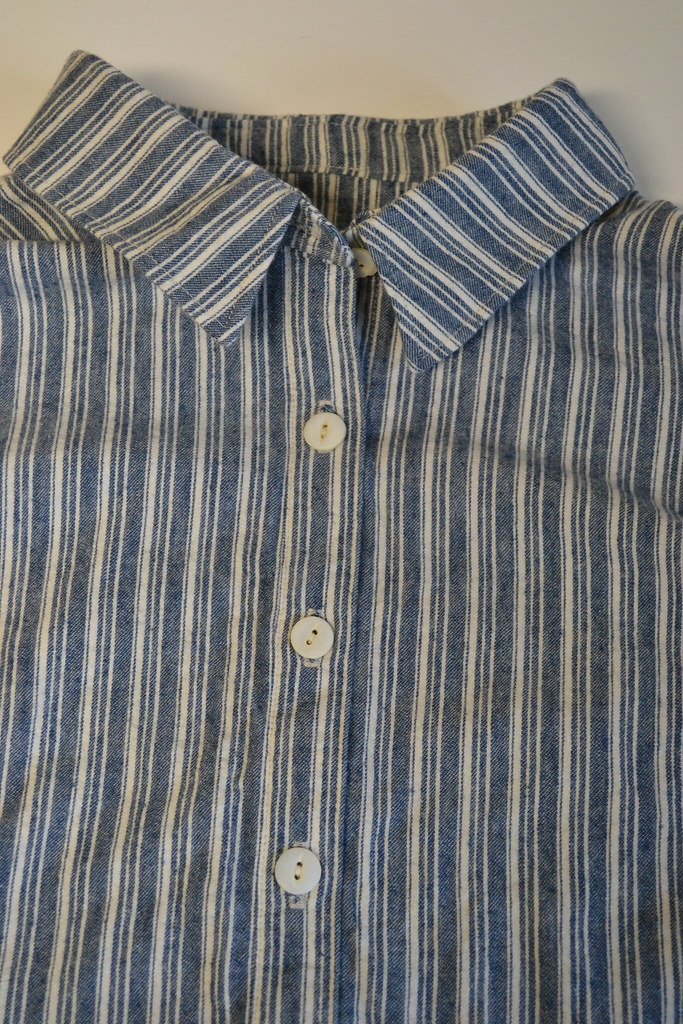
And thanks to a not-too-long-ago issue of Threads magazine, I matched the unbalanced stripe across the shoulder from front to back:
 //embedr.flickr.com/assets/client-code.js
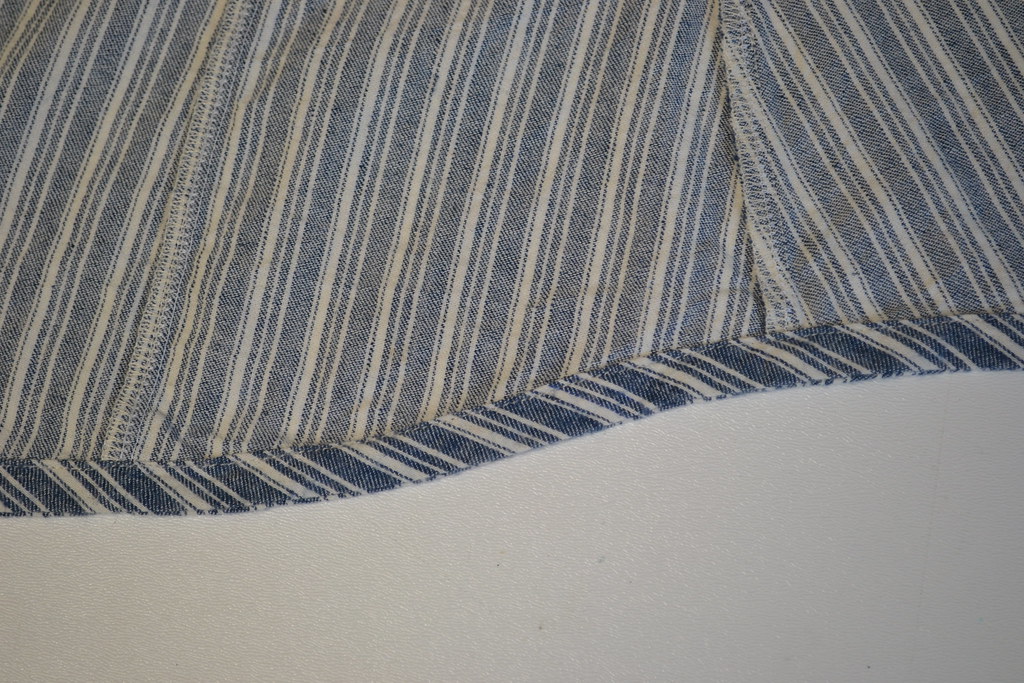
Now here’s where I went off the deep end… I matched the bias binding strips that I joined together to finish the hem! I challenge you to find the joint in that binding!
 //embedr.flickr.com/assets/client-code.js
I’ve just posted a tutorial on my blog on how to finish a curved hem like this shirttail with self-bias binding if you’re interested.
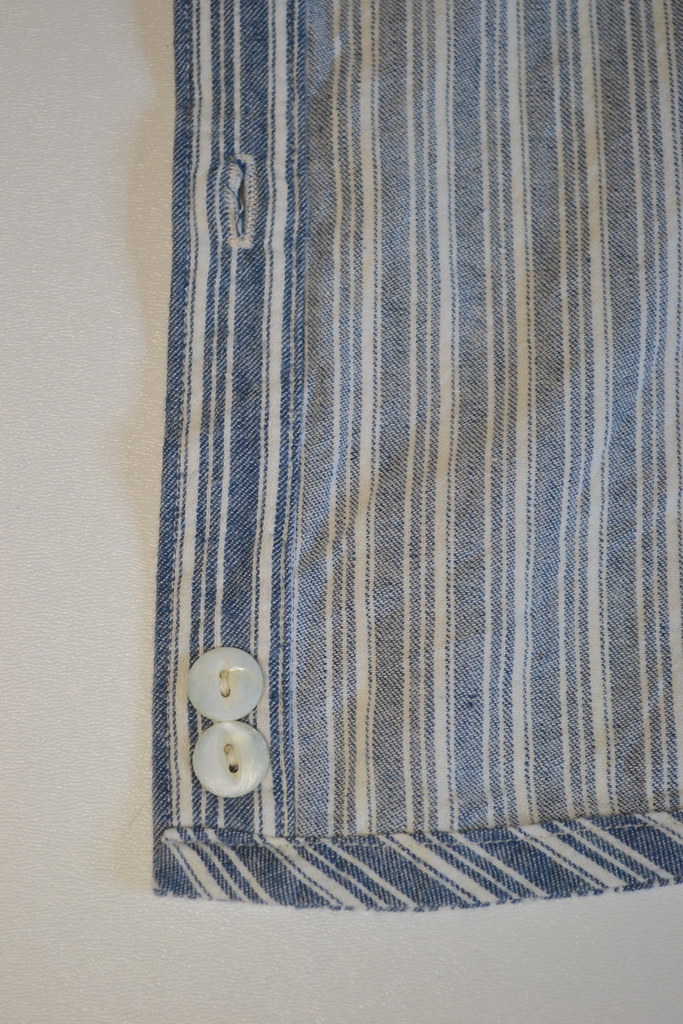
Finally, I finished off the linen version with some vintage buttons cut from real shells that have been hanging out in my extensive button collection for a long time and before they were mine they belonged to a woman who collected buttons for 80 or 90-some years. She had carefully tied together with a bit of thread so as to keep the matched set. Several of them still had old threads and bits of cloth stitched to them as if they were cut from another garment and saved. I think these buttons are seriously old and I’m so honored to put them to good use. I had two left over so I stitched them on the inside bottom of the button placket so that should I need them I would never lose them in the two big jars of white buttons in my stash.
 //embedr.flickr.com/assets/client-code.js
I’m absolutely thrilled with my linen Granville. It’s perhaps one of my very favorite garments I’ve ever made. I know this shirt is going to get a ton of wear. Perhaps I should go ahead and get to work on a twin for it now?
 //embedr.flickr.com/assets/client-code.js
Overall thoughts on the pattern: I love Sewaholic patterns with every fiber of my being. They are so clearly explained and illustrated and flawlessly designed. I was so sad to hear the recent news that Tasia has sold the company. I really hope that the new owners keep their promise to carry on the high standards that Tasia has set for independent sewing patterns. If not, well then at least we have the Granville… and Thurlows. Let’s never forget the Thurlows!

Pingback: Hack It: Granville Shirtdress | The Monthly Stitch
Thank you all for your lovely comments. 🙂
LikeLike
Wow! That chiffon shirt is a pretty incredible feat. No room for slap and dash with that fabric in that style. 🙂
LikeLike
Lovely shirts, the sheer one has come out great, I avoid shifty fabrics like the plague
LikeLike
Major props to you! I am in awe of your perfectionism there. Ah.ma.zing!
LikeLike
What a great fit you have achieved. The pattern matching detail on the linen shirt is incredible. Kudos.
LikeLike
Both of these came out BEAUTIFULLY!
LikeLike
I am super impressed with your sewing skills. You are the master of the Granville. Double points for sewing with a little one to care for.
LikeLike
Oh my that pattern matching is impressive!
LikeLike
That is impressive pattern matching!
Just wanted to thank you for the handy tips on sewing sheers as I’m about to take the plunge myself – very timely.
LikeLike
Both versions are great! I’ve been wanting to make this pattern for ages. I love the idea of making it in a chiffon so thanks for the tips.
LikeLike
Wow. I love your two versions. I never would’ve thought to make it in chiffon but it really works. Too bad it’s sweaty for hot days. The linen one will be great for that though. Linen is a great summer fabric for sure.
LikeLike
Wow, such work you have put into your two shirts. I’m amazed! At first I was thoroughly impressed with your shirt in chiffon, then Another great garment came along. That stripe matching is mesmerising.
LikeLike
Both are great makes and the fit is perfect. Well done.
LikeLike
Absolutely beautiful! & I will take you up on the challenge to find the join in your bias binding: in the middle of the wider blue stripe two stripes to the left of the seam? I really had to peer though. It’s flawless. I feel you on how satisfying it is to take the time to do stuff like that though. I just used some plaid madras to muslin a shirt pattern…& print-matched the entire thing & French seamed it.
LikeLike
You found it!
LikeLike
Pingback: Tutorial: Finishing a curved hem with bias binding | Vint Hill Vintage