Before I dive in, allow me to warn you: this post is long. Maybe a contender for the longest Monthly Stitch post ever. It’s a thorough review of three different garments. Let’s get started!

I purchased the basic “Nine to Five” pattern bundle, & made all three garments. I don’t work in an office. I’m a stay-at-home mom. But I felt the patterns could be incorporated into my busy schedule of library storytime, preschool drop-off, & wading pool playdates, right? These patterns were also way outside my comfort zone in terms of shape. But isn’t part of the fun of sewing trying new silhouettes & tackling fitting challenges?

ANDERSON BLOUSE FROM SEW OVER IT

I just could not with the sleeves on this pattern. They look okay on other people (Heather B in particular really rocks that 40s bombshell look), but I was getting major Melanie Griffith in “Working Girl” vibes. Since the pattern specifies lightweight fabrics with a fluid drape, I decided to experiment with making it sleeveless & even more appropriate for summer. I used this gorgeous voile from the Priory Square collection. The print is called Sunday Clippings.

I was very concerned that this would end up being a Boob Hanger blouse—you know, where the fabric just drapes off of your breasts like a waterfall, obscuring any waist you may have & making you look at least twenty pounds heavier.
I made a quick muslin & lo! I didn’t hate it! Like…at all! & this brings me to my first problem with this pattern & my suggestions for making it work for you: the sizing chart is all wrong. Based on the sizing chart, I should have cut the largest size, done an FBA, & graded up in the waist. Thankfully, I know to consider finished garment measurements before I commit to a size.

This blouse has enormous amounts of ease in the waist & hips. I’m talking 12+ inches. It is meant to be flowy (“billowy” would be a less charitable to phrase it). All that really matters with this pattern is that you get the shoulders right. That’s the only place that is really fitted, & it’s where all the details (shoulder gathers) are. If you pick too large a size…let’s just say the blouse can easily have an “embiggening” effect. You need the armscye to hit right at your shoulder point & not a fraction beyond. Sew Over It includes some boilerplate fit tips with the pattern, explaining that their patterns are more “closely fitting” than the average home sewing pattern. That is not relevant to this particular pattern, so don’t size or grade up if you’re on the larger side of their sizing chart.

I cut a size 16. I probably could have sized down even further, but I’m happy with my blouse. Had I sized up, this would have been a fail for sure.
One complaint about the PDF: one entire page was blank, save for borders. What a waste. The fabric requirements for this pattern may also be overstating the case a bit. The suggested fabric layout is laughably wasteful. (Literally. I laughed when I saw it.) I did eliminate the sleeve, which saved some fabric, but even with the bonkers ease through the waist & hips, I probably used less than 1.5 yards of fabric for this blouse.
I made my own bias tape to finish my back neckline & armscyes. I hand-stitched, per the pattern instructions, but it’s really not necessary. I say hand-stitch if you like to hand-stitch (I do—I quilted an queen-sized quilt by hand last fall), machine stitch if you prefer.
Let’s talk construction. The instructions are very detailed, & well-illustrated with photos, but…not great. A few things are just head-scratchers, like hand-stitching the bias facing when machine stitching isn’t going to make your garment spontaneously combust. Similarly, the instructions say to finish the cut-on blouse front facings with a zigzag stitch or serger. There’s no reason you couldn’t give them a proper hem if you prefer. This garment is so loosely-fitting, you don’t need to worry about hem ridges.

But the instructions for the drawstring hem are downright troubling. As an aside, some people have left the drawstring off altogether, saying they don’t want to add “bulk”. Read again: this blouse has 12+” of ease at the waist & hips. When you’re trying to tuck that much fabric into your waistband, a drawstring is not going to be the dealbreaker.
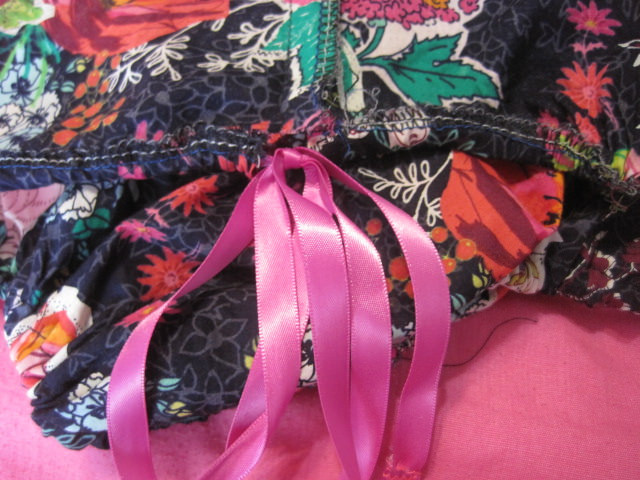
The instructions say to just use a ribbon for the drawstring. Instead, I sewed lengths of ribbon to either side of a strip of 1/4” elastic. Only the ribbon shows, tied into a nice bow at the side, but elastic is much more comfortable & helps keep the shirt where I want it to be. I imagine I’d constantly be adjusting, retying, & jostling the hem if I was just using a ribbon.
Here’s the exact wording for adding the drawstring: “With wrong sides together, press the hem over by 1.5cm. Pin and edgestitch in place leaving a 2cm gap where the folded edge of the front blouse hem meets the right side seam for the ribbon to be threaded through. Using a safety pin to help, thread a ribbon through the channel at the hem and tie a bow to fit.”
That’s it. Do you see something missing? Like instructions on how to finish the casing? These are like instructions for threading elastic into a casing for pajama pants. It works in with pajamas because the elastic is entirely enclosed within the casing, which is then stitched closed. A drawstring is different. Both ends of the ribbon need to be accessible for tying, & these instructions seem to indicate that they should just be hanging out the unfinished hole in the casing, which is INSIDE the garment. It simply doesn’t make sense!
At this point, I will direct you to my blog. I applied my drawstring in a different way, so that the casing is actually finished. I made two samples illustrating the Sew Over It drawstring instructions versus my own approach. I have step-by-step photos for each on my blog, but I’ll include the finished results here & you can decide for yourself which looks better (note I made these with scrap fabric & mismatched thread, & didn’t knock myself out doing the best sewing ever):

Sew Over It’s finished drawstring, drooping sadly from inside the garment.

My finished drawstring, all shiny & happy on the exterior of the garment.
I also found it a bit shocking that the pattern makes no mention of any kind of closure options. It just says that you can add a few hand stitches at the bust point if you’re worried about the wrap falling open. If you Google the pattern, you will find that most people who are wearing it have chosen to wear a tank underneath for modesty. Because the wrap WILL fall open. Unless you are a living statue busking at a street fair, you need some kind of a closure, & I guarantee that “a couple of hand stitches at the bust point” will distort the drape of the facings.
I fixed this problem by adding a few tiny sew-in snaps. I put the shirt on, pinned the wrap in place, & sewed in my snaps accordingly. They’re secure, they’re invisible from the outside, & they don’t warp the drape of the facings. It’s an obvious solution, employed not just by me, but also by designers making tops like this & selling them for hundreds of dollars. This pattern was inspired by the wrap blouses that Gillian Anderson wears on “The Fall”. Those blouses? HAVE CLOSURES. Just because you can’t see them doesn’t mean they’re not there. A pattern designer should take an inspiration image & translate it into not just an aesthetic copy, but also a functional one. A blouse that one cannot move in for fear of exposing herself is not a functional garment.

I circled the snaps in red, because they kind of blend in with this crazy print.
I do really like my finished blouse, & I’ve been wearing it constantly since I finished it. But I clearly have many caveats that preface any recommendation for the pattern. I think a person who considers what I’ve written here & approaches size selection & finishes accordingly can create a very successful garment, but in a perfect world, Sew Over It will revisit & rewrite the instructions. (I did drop them a line about all this already.)
ALBERTA STREET SKIRT BY SEW HOUSE SEVEN

This is another pattern that took me outside of my wheelhouse. It’s a very fitted pencil skirt with a separate faced waistband, back vent, center back zipper, & large angled patch pockets. Prior to making this skirt, I had never actually a worn a pencil skirt before! In my entire life! Being bigger on top than I am on the bottom, I simply assumed this silhouette would not flatter me. I imagined that I would end up looking more like a cake pop than a sexy librarian.

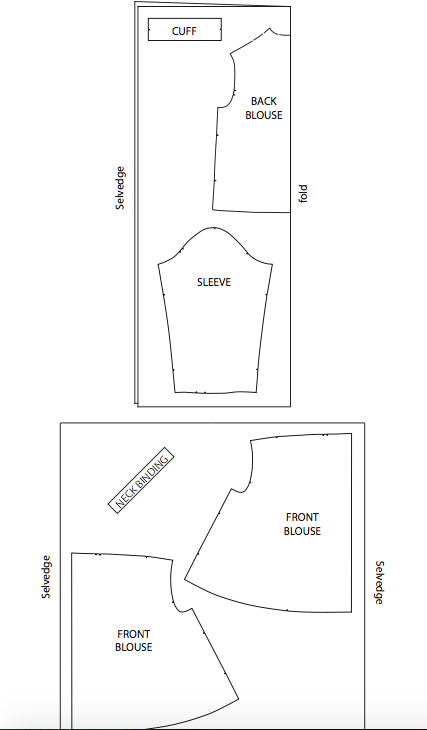
One thing to bear in mind when printing the PDF: this skirt has separate pattern pieces for the waistband pieces & waistband interfacing, grouped by size. There’s no option for only printing one size group or the other, unfortunately. So make sure you’re taping & cutting the right pieces for the size you need.
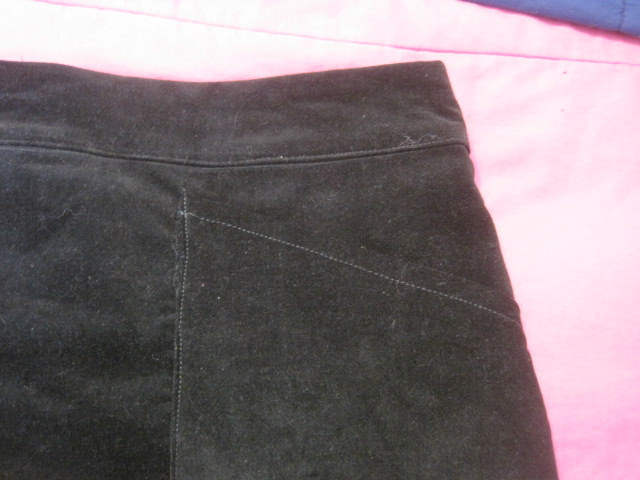
I made a few changes to the style lines & construction of this skirt. Probably the biggest change: I reversed the angle of the pockets. The original pockets start high at the seam line & slope down toward the center front. I prefer pockets that are lower at the seam line & slope upward. I just created a new pocket pattern piece with the original proportions, but reversing the slope.
I also decided that I wanted an exposed metal zipper to give the skirt a little more edge. The zipper installation in the instructions is well-explained & an easy way to create a fabric lap that hides a standard zipper. But I didn’t want to hide the zipper, so I used a slot insertion technique instead.

I also bound all my raw edges in bias tape, rather than serging. I made my own bias tape from the same voile I used for the Anderson blouse to connect the two garments, even if only I will ever see it. I lined my pockets with the same fabric, though the pattern does not call for a pocket lining.

The directions were very clear & easy to follow. Probably the trickiest bit was the vent (for me, anyway; I’d never done one before), but the instructions have great illustrations that make everything very clear. I was impressed with how much shaping the double back darts created, & the waistband is nicely contoured. I added an internal stay out of solid black quilting cotton (hemmed with voile bias tape) to try to keep the tummy area flat, since my fabric had a little bit too much stretch to have the girdle effect the designer mentions in the instructions. It was labeled “stretch corduroy” on the bolt, but the wales are so incredibly narrow, the nap so pillowy, & the stretch so pronounced, it’s really more like stretch velvet. This was another reason I bound the seams: as soon as my fabric was cut, it started to unravel & shed. I cut a size 18 at the waist, grading to a 20 in the hips, but I honestly could have sized down a bit due to the extreme stretch of my fabric.

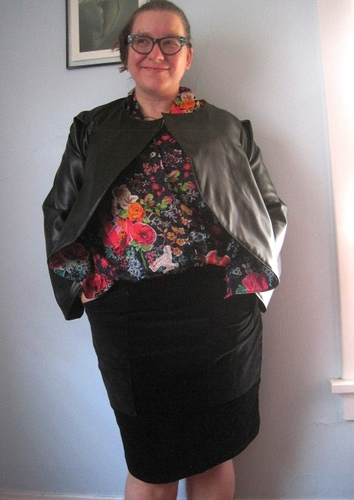
The finished result is a very nice-looking, well-finished skirt that I find surprisingly flattering! Turns out I don’t look like a cake pop in it. I’m also pleased that it is basic black. Can you believe that with all the sewing I do, I didn’t have a black skirt in my handmade wardrobe? How is that possible? I wear black all the time, & I wear skirts a lot. But I usually team patterned skirts with black tees. So this an entire outfit it a really different look for me.

This PDF almost defeated me. I have tons of experience taping PDFs together (& the bulging portfolio bag to prove it), but this is the first that had no notations whatsoever to guide me in joining the pages together. It was literally like putting together a jigsaw puzzle, complicated by the fact that the jacket is “experimental,” meaning the pattern pieces don’t look how you expect pattern pieces to look. There are a lot of unexpected curves & notches sticking out, & the pattern didn’t seem to print in any particular order. Thankfully, there are only six pattern pieces so I did figure it out before I lost my mind.
I added seam allowances & did a few alterations (widened the sleeve & armscye by 1”, added some extra width & length to the front jacket pieces as a kind of poor man’s FBA, since I couldn’t really begin to guess at where the bust point might be) & I realized that this pattern isn’t nearly as complex as it looks. So I decided to just dive in & get it done for the challenge.

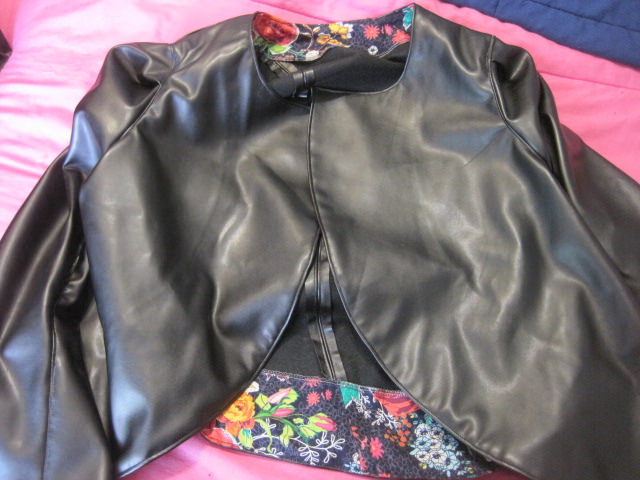
^^^ It’s supposed to look like that!
Picking fabric was probably the hardest part. I wanted something that was a heavier jacket weight, but it also needed a bit of stretch & a certain degree of drape. I went way off script by using some very stretchy black faux leather. It has a cozy woollen underside & doesn’t ravel at all, which saved me the effort of finishing my seams. I doubt this is the kind of fabric that Oki envisioned for this pattern, & it did necessitate certain construction changes. It couldn’t be pressed, for instance, so I topstitched all my seams.

Rather than using the same fabric for my facings, I employed the voile I used for the blouse & the seam finishes on the skirt. I used a mid-weight interfacing to add a little oomph. I was very impressed with how neatly the pattern came together. The instructions say to sew all the facing pieces together & then sew them to the jacket as one. I was very nervous about this, because if the facing was off by even a fraction of an inch, it would cause distortion & possibly warp the entire drape of the jacket. But everything matched perfectly! I’m happy to chalk some of it up to my own amazing sewing skills (haha), but the pattern was also spot on.

Worth mentioning, however: the English language instructions are sparse, to put it mildly. This is probably not a great choice for a beginner. If you’ve worked with facings before & have experience setting in a sleeve, you can probably handle it, but just know that the instructions are minimal at best. There are photo illustrations though!

The instructions say to flip the facings inside (clip those curves first!) & topstitch in place. But I couldn’t press or pin my exterior fabric. (Pressing would melt it, pinning would make permanent holes.) I puzzled over what to do for an hour or two before I decided to understitch the facings to get them to turn nicely without pressing, & then topstitch along the outer edge. I used double-sided fusible tape (pressed from the inside, with a cotton press cloth) to keep the inner edges in place.
The other tricky part is setting in the sleeves. You have to make two fairly deep pleats in the sleeve head to set it into the armscye. The good thing is that the whole jacket is about odd draping, strange tucks & folds. So if your sleeve pleats look a little strange, it’s okay! It’s an intentionally strange jacket!

I decided not to put any closures down the front. It’s designed to have a row of buttons, & because the front is basically two half-circles, the distortion of getting those curves to meet causes all kinds of wrinkling & bunching between the buttons. Again, intentionally. I just didn’t love that idea & knew I would never button the jacket. When I tried it on, I loved how it looked unbuttoned so…I’m just leaving it button-free. Surprisingly, my boyfriend also loves it. He says it’s very “futuristic” & that it’s one of his favorite things I’ve ever made! I expected it to make me look like a cross between a stegosaurus, Fonzie from “Happy Days,” & a cater-waiter but he says the cater-waiter doesn’t enter into it. & everyone loves Fonzie & dinosaurs, so it’s a win!

I really do love this jacket, for all its weirdness. I definitely see myself trying other Oki Style Patterns in the future!
& with that, Indie Pattern Month is over! I managed to pull something together for all five challenges. If you include wearable muslins, I cranked out thirteen garments from ten different indie patterns, each from a different company: three dresses, one skirt, one pair of jeans, three shirts, one sweater, two jackets, & two bras. Seven of the ten patterns/companies were brand new to me. Two were purchased specifically for Indie Pattern Month, one was something I received in the indie pattern swap, & these last three garments are from the bundle sales. I can hardly wait until next June!
PS–I am planning to do individual posts about each of these garments on my blog (the pattern titles will link to the relevant post, & each official pattern photo in this post is a link to the shop where you can buy the pattern) & will update this post as those go up. I’m including some styling ideas to make these looks fit into my already-existing, decidedly non-office-y wardrobe, so if you were intrigued by any of these patterns but not feeling the general “Nine-to-Five” vibe, check that out!

Pingback: The first Shenai dress on the internet? | The Monthly Stitch
Pingback: Bonus Pattern Bundle contest winners! | The Monthly Stitch
Wow! You made outfits for all 5 challenges. I’m in awe. I wish I could sew that frequently. I’m so excited that my skirt pattern worked for you AND looks great and especially that you were surprised by the fit being flattering. The outfit looks really nice – I love all the details and alterations and finishing work you’ve done.
LikeLike
Thanks! It’s a pretty great skirt. The fabric I used makes it way too hot for the current weather; I don’t think anyone wants to wear corduroy when it’s 100 degrees out. But I foresee it being a real workhorse this fall.
LikeLike
What an interesting post ! You have been very thorough, especially with the Anderson blouse, I haven’t made it but would definitely agree with your issues and will bear them in mind if I ever do make it. A great outfit and I especially love the trim detail on your skirt vent. Pretty and witty.
LikeLike
Thank you! Yeah, I had some feelings coming down so hard on the Anderson blouse. I wondered if it was “appropriate” to be so negative, but…this is a pattern that people are paying money for, & if it is sewn to the measurements & directions provided, people are going to feel that they’ve wasted their time & money. I think that’s worse than a critical (& objective–I was prepared to write a rave if it had been a good pattern) review. Online, I found a lot of people tepidly voicing some disappointment with the pattern & then blaming themselves for not having the right body type to pull it off or whatever. No, the pattern just isn’t very good. The designer came up with an approximate facsimile of her inspiration blouse & didn’t consider finishings or closures at all, nor did she deviate from her standard pattern block, which is not sized appropriately for this style.
Blah blah blah. I’ve only been sewing for a few years, but I am finally starting to get good enough that I can see the flaws in patterns & not just blame myself for not being good enough at sewing. So that’s a good thing, right?
LikeLike
Thanks for the detailed reviews! I’ve been considering the Oki Jacket, this was very helpful.
LikeLike
The Salt jacket is really cool. The weirdness on the back (those draping curves) come from the fact that the back is two curves sewn together. The jacket used to illustrate the pattern is some kind of woollen knit, which drapes a lot more softly than my synthetic faux leather. It was just really interesting to sew such a uniquely designed pattern. The PDF was kind of a hot mess, but I think Oki is working on that. (When I wrote the post, her site said it was down so she could reconfigure her PDFs.) She has a few other garments that I’m really intrigued by.
LikeLike
Yep I’ve got that blouse pattern too and had similar frustrations with it. I do love it though – just with my own alterations on it
LikeLike
On the plus side, the no-closures issue makes it perfect for Operation Boob, amirite? Haha!
LikeLiked by 1 person
Absolutely- I think once the open bar on boobs shuts I’ll make more adjustments!
LikeLiked by 1 person
Awesome work Ciara. Very inspiring. I won the skirt pattern in the New to Me challenge so I’m really interested to see peoples makes of that especially. Love what you did with it.
LikeLike
Thanks! I think this skirt will get a lot of wear this fall, when the weather is more corduroy-friendly.
LikeLiked by 1 person
I’m hoping to make one up in wool suiting before winter is over here.
LikeLike
It’s a pretty quick sew. If you serge the seams to finish & use the zipper installation in the directions, it will just take a couple of hours.
LikeLiked by 1 person
I don’t use a serger but it certainly looks like it will be a quick and easy make.
LikeLike